 Pin this
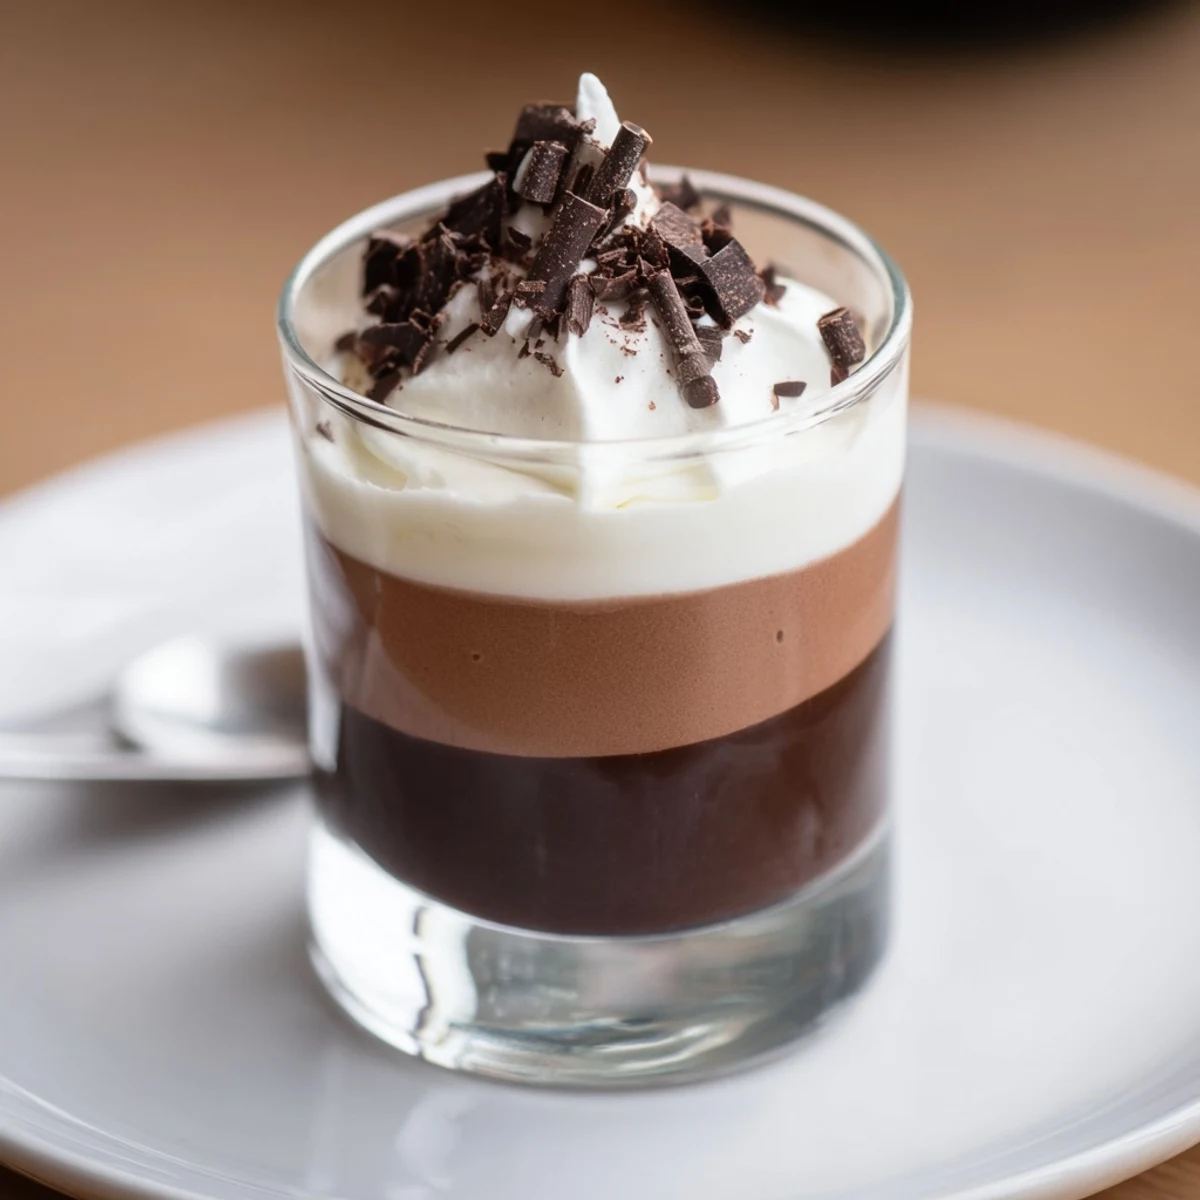
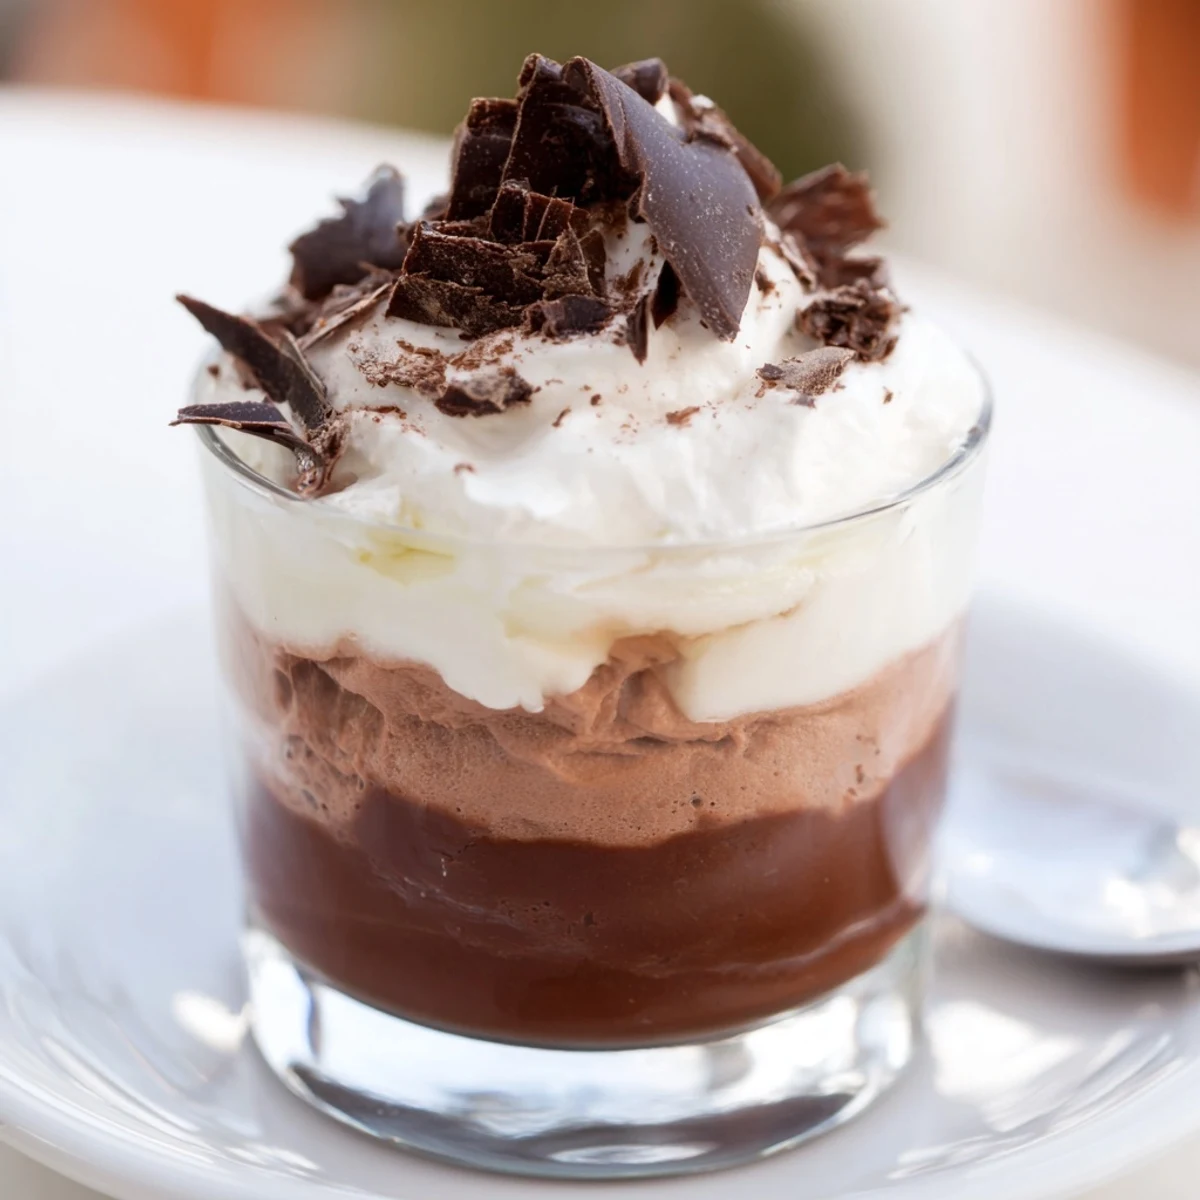
 Make three silky mousses—dark, milk and white—staggered into individual cups. Each layer is built by folding melted chocolate into a sugar-whisked egg yolk and soft-peak whipped cream, then chilled between additions to ensure clean, distinct strata. Allow a final chill of at least one hour. Use good-quality chocolate, pipe layers for precision, and add a splash of coffee liqueur to the dark layer for extra depth.
The sheer magic of chocolate always finds its way into my kitchen, but it wasnt until a rainy afternoon that I attempted my first batch of triple chocolate mousse cups. There was a particular hush outside, and melting chocolate created a kind of warmth that seemed to rival the weather. I found myself lost in the shifting shades of brown and cream, completely captivated by the gentle swirling of each layer. Who knew that a craving for something sweet and beautiful could lead to a dessert so sophisticated yet comforting?
I once made these mousse cups for a friend's birthday, rushing to get the last layer chilled before the guests arrived. We joked about the perfection of the layers, but the true joy came from watching everyone savor that first cool, airy bite in surprised silence. Sharing these always turns the table into a tiny moment of indulgence that makes you forget everything else. Even my dad, famously aloof about dessert, quietly asked for a second cup.
Ingredients
- Dark chocolate (100 g, minimum 60% cocoa): A good dark chocolate brings depth; chopping it finely helps it melt evenly without any burnt bits.
- Milk chocolate (100 g): Opt for creamy milk chocolate, ideally with high cocoa butter, so the mousse stays light—avoid anything waxy.
- White chocolate (100 g): White chocolate can seize easily, so keep it on low heat and stir until just melted for the smoothest texture.
- Egg yolks (3 large): They add silkiness and structure—make sure your yolks are at room temperature so they incorporate smoothly.
- Sugar (4 1/2 tbsp): Measure carefully; too much can overpower the chocolate and mask subtle flavors.
- Heavy cream (300 ml, cold): Cold cream whips up lighter and holds its peaks better, so chill your bowl if you can.
- Shaved chocolate or cocoa powder (optional): This is more than garnish—it signals the treat within and adds a touch of drama when you serve.
Instructions
- Start with the dark chocolate layer:
- Melt your dark chocolate gently in a bain-marie or with short microwave bursts, swirling the aroma into the kitchen. Let it cool for a minute, then whisk egg yolk and sugar until pale and frothy—feel how the texture changes just under your whisk.
- Fold and blend:
- Gently fold the glossy chocolate into the egg mixture, breathing in those deep cocoa notes. Whip your cold cream to soft peaks and fold it in, keeping the mousse airy—this one is the foundation, so spoon it evenly into each cup and slide them into the fridge to chill.
- Create the milk chocolate mousse:
- Repeat the gentle melting and folding process with the milk chocolate, egg yolk, and sugar. Whip more cold cream, blend, and pour the mousse atop the dark chocolate layer, smoothing it out for a neat line of contrast—back to the fridge they go.
- Finish with white chocolate:
- Delicately melt your white chocolate—it burns easily, so go slow and stir constantly. Combine as before with the final egg yolk and sugar, fold in the last billowy cream, then pipe or spoon this cloud-like layer over the others; chill for at least one hour until everything has set gently.
- The grand finale:
- Right before serving, crown with shaved chocolate or a flutter of cocoa powder, feeling a little like a magician with a flourish—then scoop in.
 Pin this
 On a late autumn evening, I found myself making these for a dinner with friends who had all had a hard week. As we each took a scoop, conversation paused and grins crept around the table—suddenly, the week felt lighter. A well-crafted dessert can shift a mood, even if just for a few minutes.
Choosing the Right Chocolate Matters
For the best mousse, splurge on real chocolate with a smooth finish—cheap bars sometimes add stabilizers that give mousse a strangely waxy texture. I found local chocolate brands sometimes outshine the big names, so don't be afraid to try smaller-batch options. Taste each before starting; if you love to nibble it on its own, it's good enough for your mousse.
Small Tools for Big Results
A cold metal bowl makes whipping cream feel almost effortless and helps it hold peaks longer—learned this after my whipped cream kept slumping in summer heat. Having a lightweight silicone spatula lets you gently fold in each layer without knocking out the air. If you don't have a bain-marie, carefully melt chocolate in short microwave bursts, stirring between each—never walk away, even for a second.
Presentation Tips That Wow
Layering is half the fun—use clear glasses so every layer is on display and reveals the trio of chocolates in each spoonful. I pipe the last layer using a plastic bag with the corner snipped, which makes the finish tidier and more dramatic. Dressing up with chocolate shavings or a dusting of cocoa always wins praise—and lets you hide any imperfect edges from hurried spooning.
- Make sure all mousse layers are cooled before adding the next, so colors stay sharp.
- Wipe the inside of the glass if you spill mousse while layering for a pretty finish.
- Let mousse chill as long as possible for the best texture and flavor—overnight works wonders.
 Pin this
 However you serve these triple chocolate mousse cups, let yourself enjoy the process as much as the result. There's delight in every layer, both in making and in sharing them with people you love.
Recipe FAQs
- → Can I use store-bought whipped cream?
-
You can, but use a chilled, unsweetened variety and whip it to soft peaks yourself for best texture. Stabilized whipped cream or a small amount of gelatin helps maintain structure between layers.
- → How do I prevent the chocolate from seizing when melting?
-
Melt chocolate gently over a bain-marie or in short microwave bursts, stirring frequently. Ensure no water contacts the chocolate and allow it to cool slightly before folding into egg and cream mixtures.
- → What’s the easiest way to get clean, even layers?
-
Chill each layer until slightly set before adding the next. Use a piping bag or a small spoon and work slowly, holding the cup steady to avoid disturbing the layer below.
- → Can I omit egg yolks or use substitutes?
-
Omitting yolks changes texture. For egg-free versions, consider stabilized whipped cream with dissolved gelatin or whipped aquafaba, adjusting proportions to match the mousse silkiness.
- → How long can these cups be stored?
-
Store covered in the refrigerator and consume within 48 hours for best quality and safety. Freshness declines after a couple of days and textures may soften.
- → Any flavor variations to try?
-
Add a splash of coffee or hazelnut liqueur to the dark layer, fold in a pinch of sea salt to the milk layer, or top with cocoa powder, shaved chocolate, or toasted nuts for contrast.